All Categories
Featured
Table of Contents
- – Rv Trailer Service Near Me Riverside, CA
- – OCRV Center
- – Travel Trailer Awning Replacement Riverside, CA
- – Rv Trailer Repair Shop Riverside, CA
- – Rv Travel Trailer Repair Near Me Riverside, CA
- – Travel Trailer Window Replacement Riverside, CA
- – Horse Trailer Repair Near Me Riverside, CA
- – Horse Trailer Repair Near Me Riverside, CA
- – Rv Trailer Repair Near Me Riverside, CA
- – Rv Trailer Service Near Me Riverside, CA
- – Travel Trailer Service Riverside, CA
- – Rv Trailer Repair Near Me Riverside, CA
- – Rv Trailer Service Near Me Riverside, CA
- – Trailer Window Replacement Riverside, CA
- – OCRV Center
Rv Trailer Service Near Me Riverside, CA
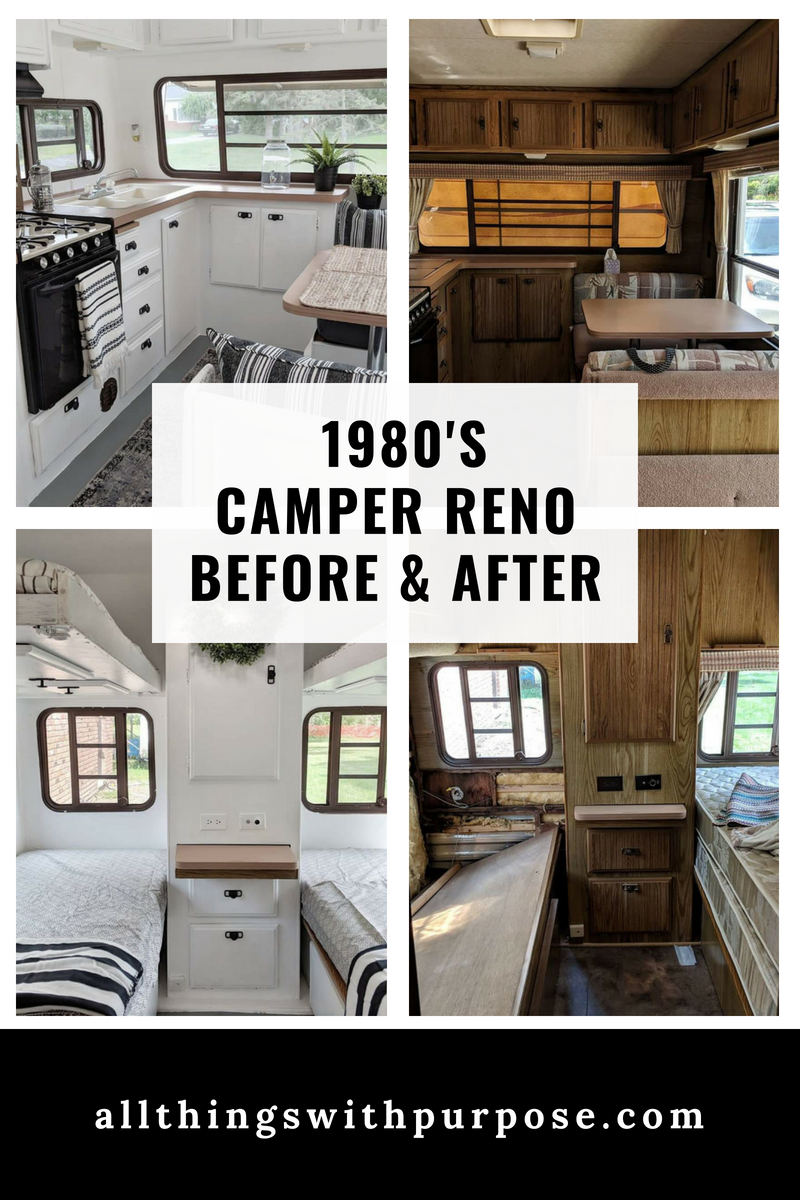
Below are in the past and after shots. I obtained the trailer home and pressed it in my garage. Time to reach function! The bulk of the timber was connected to the trailer with old corroded screws. I made use of an outlet wrench and crescent wrench for this action. You can see in the image below that the old plywood needed to be replaced.
I ended up using a crowbar to get rid of the timber. All of the plywood was effectively gotten rid of. What a mess! Remove any type of rusted screws and stuck screws using an angle grinder with a metal cutoff blade. Be really careful and ensure to put on safety and security defense. Move and scuff all the dust and gunk out of the trailer framework.
Travel Trailer Awning Replacement Riverside, CA
I made use of 120 grit sandpaper. As soon as the frame has been fined sand, remove lights if needed and tape off areas you don't want painted.

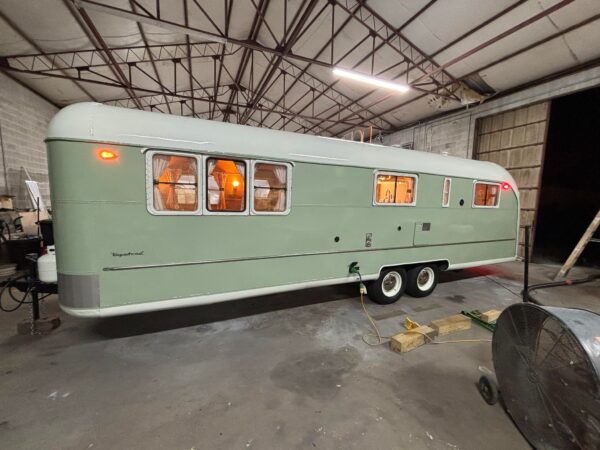
The trailer is now prepped for painting. Usage enamel spray paint to make your trailer look like brand-new. I commonly paint all metal surfaces, even underneath.
Rv Trailer Repair Shop Riverside, CA
Because it is a just a trailer, I simply spray painted the edges with white. To secure the wheels from overspray you can tape them off. One thing I like to do is spray the tires with "TireWet" to shine up the tires and make them resemble new. Repaint the rims using gloss white enamel.
Pin it This is what the trailer looked like after finishing all of the painting. I affixed the side boards making use of 2 1/4 inch bolts.
Rv Travel Trailer Repair Near Me Riverside, CA
Classic Trailer Talk is a location to check out, talk about, and post topics connected to all points classic trailer. If you would such as to become a participant of Vintage Trailer Talk, we ask that our members follow the Online forum Rules in order to guarantee a positive experience for everybody. Please put in the time to Register and we really hope to below from you quickly.
I'm a lil surprised out of every one of those that chose one up, none have actually come back with opinions - Travel Trailer Ceiling Repair Riverside. I simply looked with the "totally free duplicate". I believe someone made a respectable initiative to share what they had actually learned with I think it is an inadequate influence on those brand-new trailer owners who intend to "do it best" and actually bring back a trailer
The frames on these trailers weren't that strong. I disagree with having individuals believe they can make mold and mildew and rot "go away" by covering and or concealing it.
What of the new person hooked on the vintage trailer ownership concept that gets among these ravaged trailers assuming it is "brought back"? Just how several people are tricked each year right into acquiring one by a seller that understands complete well the problem, however misinforms to make an (unjust) revenue. Far, no one has been injured that I have actually heard by one of these "covered together" trailers disintegrating while running down the freeway, however sooner or later it will certainly occur, with any luck not while in front of a person you care around.
Travel Trailer Window Replacement Riverside, CA
To those that simply want to repair an old trailer and not "restore it", no problem, it can be a good method to take pleasure in a trailer on a spending plan, yet be certain you do it safely. The old saying that goes something like; Approving without question advice provided by somebody trying to offer you something is typically a risky road to take a trip ...
I had the opportunity to possibility a vintage trailer at the beginning of start restoration processReconstruction
Horse Trailer Repair Near Me Riverside, CA
Howdy. Now prepare to hold onto something, this insane task can be a thrilling experience! I do not have a great deal of time to publish now, to answer your concerns done in depth, but let's just claim, "start below: "You will certainly find numerous video clips of all different stages of trailer remediation there, right to the nuts and bolts of the building and construction of these old jobs.
Traveling trailers are not built like houses are. Real fast one more thing . Openings with the wall surfaces and roofing should be secured around fixtures making use of putty tape.
Horse Trailer Repair Near Me Riverside, CA
Remember we are right here to assist, and anything that seems like criticism is simply that, crucial evaluation, and nothing individual. Most of all, have fun!.
If you've ever seen The Long, Long, Trailer with Lucille Round and Desi Arnez, you know the charm of the vintage trailer. There's something about seeing a totally recovered item of the past that reverberates with individuals around the world. Of course, there's a huge distinction between appreciating a restored vintage trailer, and doing the actual remodelling.
Rv Trailer Repair Near Me Riverside, CA
Unexpectedly that desire trailer has actually become a cash drawing equipment. To restore a classic trailer you need to have passion or else your chance of sticking it out with the effort is slim. The good news is some individuals have the enthusiasm and drive that it requires to get the task done. Go Into Justin Scribner of Flyte Camp Vintage Trailer Renovations.
Flyte Camp, located in Bend, Oregon focuses on recovering travel trailers from the 1930s through the '50s. Justin Scribner understands the stress of the ordinary retro trailer acquisition.
He lost a vehicle load of cash in the early days. Bring back these vintages takes a whole lot of tenacity. Flyte Camp remains in high demand as one of the only firms in the United States that expertly recovers vintage RVs. People all over the globe deliver their vintage gems to Flyte Camp for a restoration.
If that's not nearly enough, it shows up that Flyte Camp will quickly be the subject of their own reality TV show. Audiences will follow Justin and he pursues for the ideal repair jobs. Among things that makes Flyte Camp attract attention from the pack is their degree of research.
Rv Trailer Service Near Me Riverside, CA
They intend to recognize the initial trailer prior to recovering it to its previous glory. Anther point that Flyte Camp concentrates on is information such as woodwork. Unlike the Motor homes of today, most traditional trailers include stunning timber insides. This, naturally, contributes to the job. It takes a great deal of time to recover antique and often mistreated timber.
In the office they respond to 50-100 calls and emails everyday. What does a brought back trailer cost? Here's one example. The Scribners bought classic trailer for a simple $2,400 a deal right? Over the training course of a number of months, the team invested $23,000 on materials and place in numerous hours in labor.
Travel Trailer Service Riverside, CA
When you include up all the time and power, you require to like the work or it's barely worth it. Over time he established a passion for mid century trailers and bought one to offer recovering a whirl.
The trailer came to be a regular fixture in the Scribner's driveway. Justin worked on it when he had time.
In time, he overcame his very first reconstruction, and his spouse Anna joined him in his new located passion. The couple began to camp with their trailer taking short weekend breaks away.
Rv Trailer Repair Near Me Riverside, CA
One pulled from an old area and an additional bought online. The enthusiasm had held. Actually, as the economic downturn shut the floor covering service, the retro organization will take flyte! Today, Flyte Camp has six employees and a 7,000 square foot shop. They work with several devices at once and deal with everything from interior decoration to pipes.
While Airstream get's a whole lot of press, Flyte Camp is everything about the early age trailers from 1935-1945. This was the height of the commercial design in the United States and many believe these trailers are genuinely a work of art. In spite of the financial clinical depression that brushed up the nation around this moment period, many families preserved adequate cash to acquire high-ends in life.
Rv Trailer Service Near Me Riverside, CA
These trailers were normally designed in the shape of a bread loaf and offered a tin roof covering with masonite exterior siding. Haute couture was king and the interior decorations were created with stylish interiors like you could find on a first-rate train. Many of the trailers featured dark walnut or cherry timber with hand sculpted moldings and artful tile job.
In the 1940s the episode of The second world war quit travel trailer manufacturing. The battle initiative was the leading concern. When the battle mored than, travel trailers were hotter than ever before. Made with a steel body, many of the devices were secured similar to an aircraft. The cooking area cupboards and countertops were additionally produced with airplane stainless steel and while these units were extra mass created, they still used quality materials.
In the past, craftsmanship counted. Every piece of the trailer was done by hand without a pressing routine. They put in the time to make things right. They attempted brand-new points. They examined their restrictions. Road traveling was still in its infancy and making people happy was these builder's key problems.
At Flyte Camp they make every item of the repair by hand. A remediation usually entails eliminating the trailer covering, removing out the electric and establishing the condition of the framework and interior panels.
Trailer Window Replacement Riverside, CA
Obviously, this procedure can take months. When Flyte Camp consents to a project they do their finest to bring the trailer back to its initial splendor. There's something enchanting about saving bringing an old trailer back to life. As families purchase reconstruction, they are maintaining the past. That's something that Justin loves.
You can recover it on your own. The Sande family members in Redmond, Oregon determined to do simply that. They acquired a 1950's Traveleze for $1,500. They could not think their luck. Then they started the task. They uncovered rot all over. From framework to the roofing, the trailer required major aid. Within a few weeks they know that they were out of their organization.
OCRV Center
Address: 23281 La Palma Ave Yorba Linda, CA 92887Phone: (714) 909-1444
Email: [email protected]
OCRV Center
Eric Sande learnt the hard means that recovering a classic trailer is not a weekend break task. Eric called Flyte Camp to ask for assistance. $25,000 later the "canned ham" style trailer was done. "I originally believed, 'Gee, if I spend $8,000 to $10,000 perhaps it will certainly deserve something,'" recalls Sande.
Travel Trailer Repairs Riverside, CACamper Floor Repair Near Me Riverside, CA
Travel Trailer Roof Replacement Riverside, CA
Trailer Windows Replacement Riverside, CA
Trailer Roof Repair Riverside, CA
Horse Trailer Repairs Riverside, CA
Cargo Trailer Repair Riverside, CA
Travel Trailer Ceiling Repair Riverside, CA
Travel Trailer Awning Replacement Riverside, CA
Rv Trailer Repair Shop Riverside, CA
Travel Trailer Siding Repair Riverside, CA
Trailer Restoration Riverside, CA
Travel Trailer Service Riverside, CA
Travel Trailer Repairs Riverside, CA
Travel Trailer Floor Repair Riverside, CA
Rv Trailer Repair Shop Riverside, CA
Travel Trailer Ceiling Repair Riverside, CA
Horse Trailer Repairs Riverside, CA
Camper Floor Repair Near Me Riverside, CA
Travel Trailer Repairs Riverside, CA
Travel Trailer Repairs Riverside, CA
Fifth Wheel Service Riverside, CA
Travel Trailer Ceiling Repair Riverside, CA
Trailer Restoration Riverside, CA
Travel Trailer Roof Replacement Riverside, CA
Trailer Windows Replacement Riverside, CA
Travel Trailer Furniture Riverside, CA
Travel Trailer Floor Repair Riverside, CA
Trailer Windows Replacement Riverside, CA
Travel Trailer Ceiling Repair Riverside, CA
Camping Trailer Repair Near Me Riverside, CA
Horse Trailer Repairs Riverside, CA
Travel Trailer Window Replacement Riverside, CA
Rv Travel Trailer Repair Near Me Riverside, CA
Camper Floor Repair Near Me Riverside, CA
Travel Trailer Repairs Riverside, CA
Trailer Roof Repair Riverside, CA
Rv Travel Trailer Repair Near Me Riverside, CA
Rv Trailer Repair Shops Near Me Riverside, CA
Camping Trailer Repair Near Me Riverside, CA
Travel Trailer Replacement Windows Riverside, CA
Trailer Floor Repair Riverside, CA
Rv Trailer Repair Near Me Riverside, CA
Rv Trailer Repair Shop Riverside, CA
Trailer Awning Replacement Riverside, CA
Trailer Floor Repair Riverside, CA
Travel Trailer Awning Replacement Riverside, CA
5th Wheel Repair Near Me Riverside, CA
Rv Trailer Service Near Me Riverside, CA
Trailer Floor Repair Riverside, CA
Rv Trailer Repair Shops Near Me Riverside, CA
Cargo Trailer Repair Riverside, CA
Trailer Floor Repair Riverside, CA
Trailer Window Replacement Riverside, CA
Horse Trailer Repair Near Me Riverside, CA
Travel Trailer Repairs Riverside, CA
Trailer Windows Replacement Riverside, CA
Travel Trailer Roof Replacement Riverside, CA
Cargo Trailer Repair Riverside, CA
Trailer Roof Repair Riverside, CA
Camping Trailer Repair Near Me Riverside, CA
Camper Trailer Service Riverside, CA
Cargo Trailer Repair Riverside, CA
Rv Trailer Repair Shops Near Me Riverside, CA
Rv Trailer Repair Shops Near Me Riverside, CA
Camping Trailer Repair Near Me Riverside, CA
Trailer Floor Repair Riverside, CA
Travel Trailer Floor Repair Riverside, CA
Rv Trailer Service Near Me Riverside, CA
Trailer Floor Repair Riverside, CA
Horse Trailer Repairs Riverside, CA
Horse Trailer Repairs Riverside, CA
Travel Trailer Service Riverside, CA
Cargo Trailer Repair Riverside, CA
Fifth Wheel Repair Near Me Riverside, CA
Rv Travel Trailer Repair Near Me Riverside, CA
Trailer Floor Repair Riverside, CA
Trailer Roof Repair Riverside, CA
In Seo Company Riverside, CA
Finding A Good Local Seo Specialist Riverside, CA
OCRV Center
Table of Contents
- – Rv Trailer Service Near Me Riverside, CA
- – OCRV Center
- – Travel Trailer Awning Replacement Riverside, CA
- – Rv Trailer Repair Shop Riverside, CA
- – Rv Travel Trailer Repair Near Me Riverside, CA
- – Travel Trailer Window Replacement Riverside, CA
- – Horse Trailer Repair Near Me Riverside, CA
- – Horse Trailer Repair Near Me Riverside, CA
- – Rv Trailer Repair Near Me Riverside, CA
- – Rv Trailer Service Near Me Riverside, CA
- – Travel Trailer Service Riverside, CA
- – Rv Trailer Repair Near Me Riverside, CA
- – Rv Trailer Service Near Me Riverside, CA
- – Trailer Window Replacement Riverside, CA
- – OCRV Center
Latest Posts
Ontario Seo Internet Marketing Service Near Me
Rowland Heights Attorney Internet Marketing
Montclair Internet Marketing Agency Services
More
Latest Posts
Ontario Seo Internet Marketing Service Near Me
Rowland Heights Attorney Internet Marketing
Montclair Internet Marketing Agency Services