All Categories
Featured
Table of Contents
- – Rv Roof Repair Near Me Placentia, CA
- – OCRV Center
- – Motorhome Roof Replacement Placentia, CA
- – Rv Roof Repair Near Me Placentia, CA
- – Rubber Roof For Rv Placentia, CA
- – Rv Rubber Roof Replacement Cost Placentia, CA
- – Repair Rv Roof Leak Placentia, CA
- – Repair Rv Roof Placentia, CA
- – Rv Rubber Roof Maintenance Placentia, CA
- – Rubber Roofing For Campers Placentia, CA
- – Rv Roof Repair Placentia, CA
- – Rv Roof Leak Repair Placentia, CA
- – Replace Rv Roof Placentia, CA
- – Rv Trailer Roof Repair Placentia, CA
- – Resealing Rv Roof Placentia, CA
- – OCRV Center
Rv Roof Repair Near Me Placentia, CA
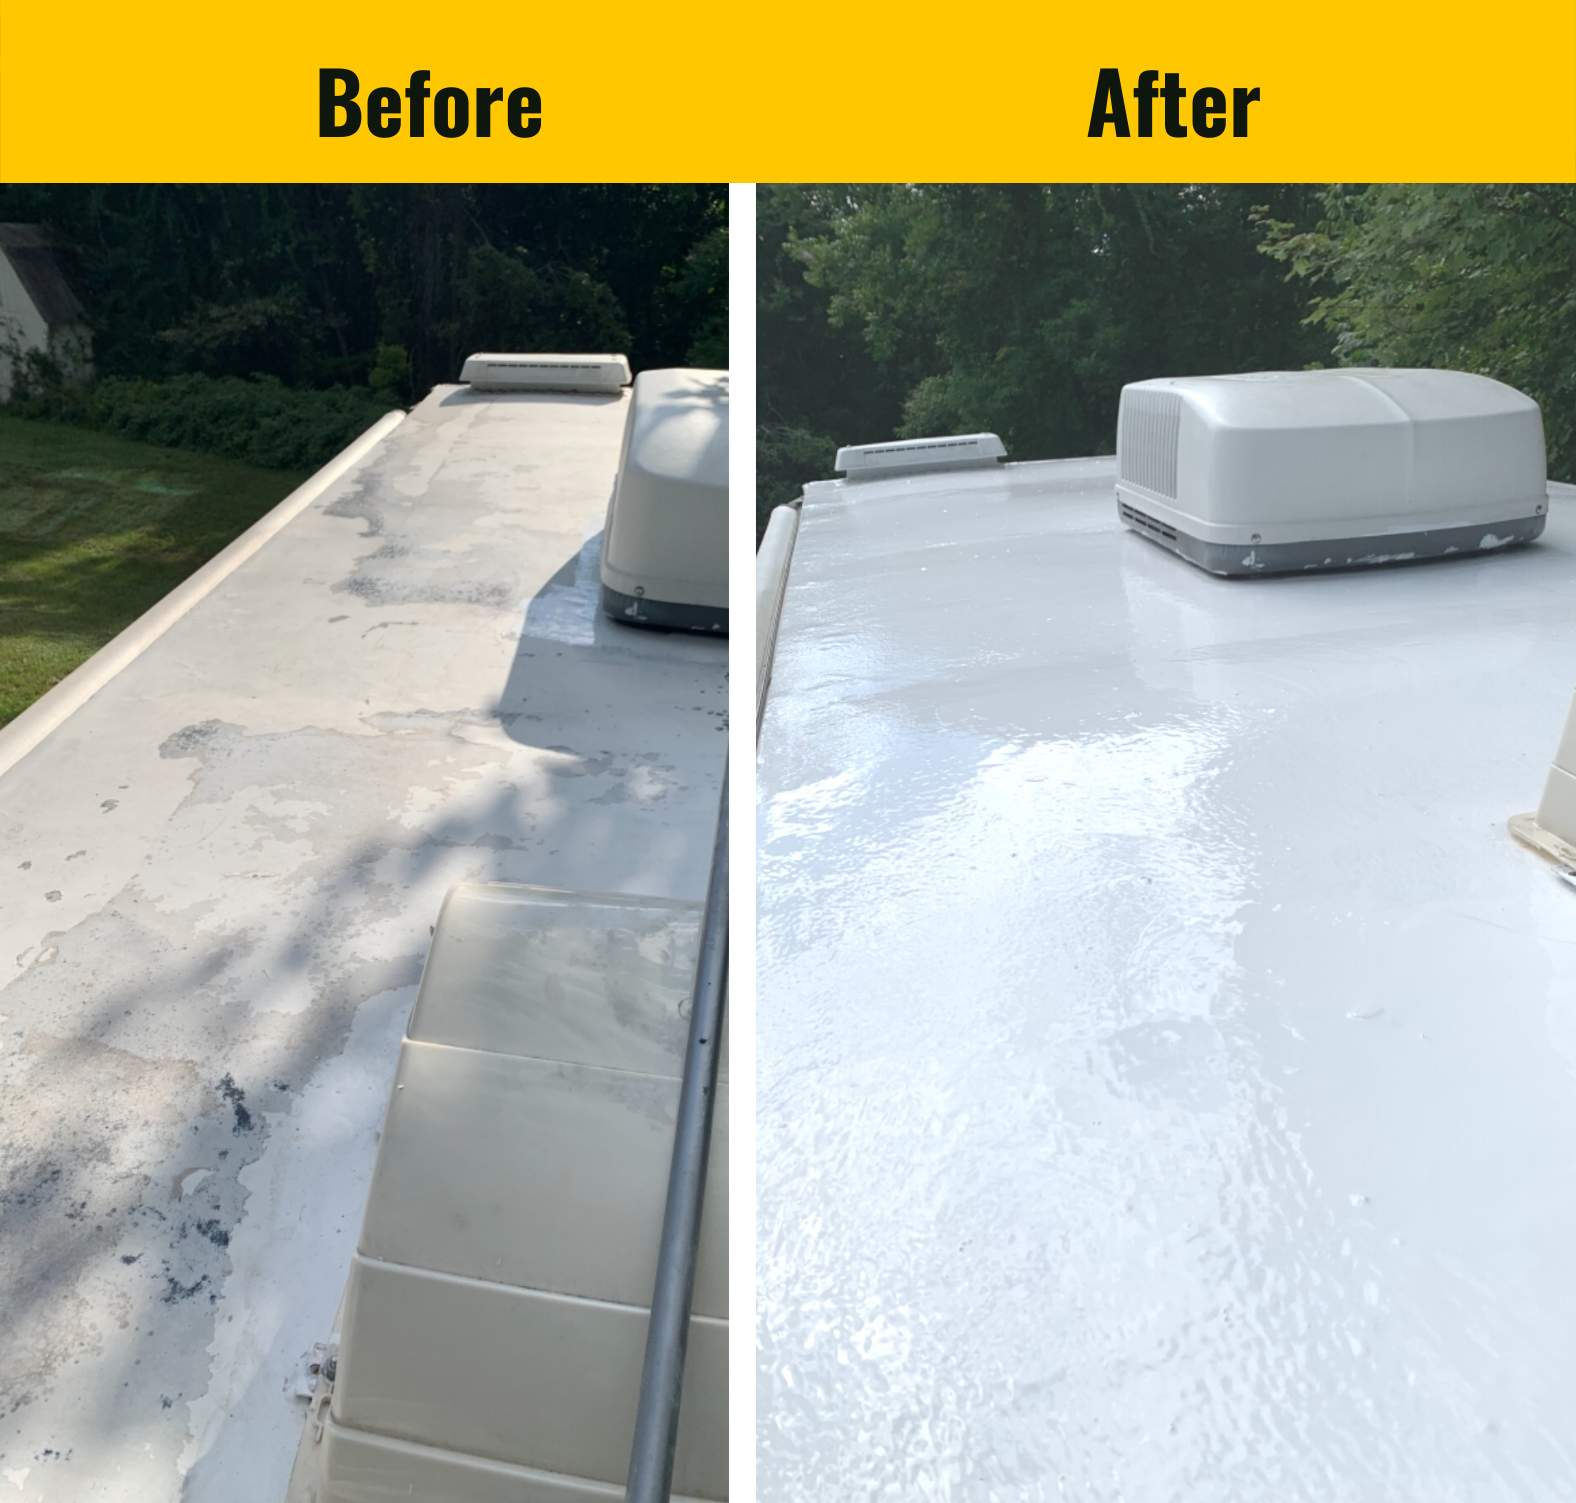
Relying on the state of the roofing system's rips and splits, you might need to complete a spot repair service or change the whole roof. Pooled water and color motivate the growth of mold and mildew and mold, which can be hard to cleanse from a recreational vehicle roofing system. RV roofing systems can oxidize for many years.
RV roofs with inadequate drain have low areas that gather water from washing or rainfall. Water being in one spot for as well long can compromise the roof product and urge germs development. Exposure to UV rays can create the roofing system product to weaken. Deterioration can produce roof covering quality problems that stop coatings from adhering to the roofing.
Motorhome Roof Replacement Placentia, CA
Performing recreational vehicle roof maintenance regularly offers a number of advantages: Though routine upkeep requires you to spend money and time right into cleansing and fixing your roof, you will certainly conserve much more in the future. Upkeep aids your motor home last much longer by repairing minor problems before they become significant problems. All kinds of climate can cause wear and tear on your roofing system.
A well-kept RV is commonly more useful than one with a leaky roof. Motor home roof covering upkeep currently can make it easier to sell or trade in your motor home in the future. No matter the roof product, motor home proprietors need to finish precautionary upkeep each to 3 months. You will certainly require these devices and products: Roofing system sealer secures the roof covering of your RV from harmful UV rays.
Motor homes that have a built-in ladder typically have a walkable roof. Furthermore, be careful not to tip on the roof cross competes and view for barriers when on the RV roof for your safety.
Rv Roof Repair Near Me Placentia, CA
Cleaning your motor home roof covering numerous times a year gets rid of the particles and protects against mildew from holding and causing further damages. Adhere to these actions to clean your recreational vehicle's roofing: Sweep debris off the roofing, particularly in the areas around the roofing system fixtures. Use a pipe and water to rinse off the roof.
Rub the roofing system with a brush, moving in circular motions. If needed, add even more cleaner and scrub until the roofing is tidy.
This item has a light abrasive to eliminate the oxidation and can be rubbed until it beams. A UV sealant or wax protects the RV roof from UV rays, as exposure to the sun can make the roof covering material fracture and leakage. This sealant additionally makes the roof glossy and stops black streaks from basing on the walls.
Rubber Roof For Rv Placentia, CA
Some RV insurance plan anticipate a roof covering replacement every 10 to 15 years. EternaBond tape is one technique for RV roofing system repair work. This tape covers little tears and roof covering and wall surface separations alike, creating a leak-proof seal that avoids water from entering into your RV. After reducing the tape to dimension, leave a huge margin around the tear and push it right into place, ensuring the piece is laid level versus the surface area.
KOA has even more than 500 camping sites throughout The United States and Canada near historical cities and beautiful landscapes. With more than 55 years of experience, KOA offers a leading outdoor camping experience that deals with every traveler. This experience with outdoor camping includes caring for a motor home. KOA's valuable staff are trained and knowledgeable in recreational vehicle maintenance finest practices, from the roofing system to the tires.
Established in Billings, MT in 1962, KOA's household of campground brands KOA Trip, KOA Vacation and KOA Hotel today serve more than a million camping households annually. KOA is committed to "connecting individuals to the outdoors and each other" by providing individuals with a variety of outdoor camping experiences and the details they require to maximize their camping trip.
There are numerous reasons you should regularly recoat your RV roofing system, securing it versus not just water damages, but sunlight, wind, and put on and tear. Like any kind of kind of electric motor car, RV roof coverings are built to hold up against difficult weather condition, from snow to hail to a deluge. Nonetheless, the roofing system product can still wear gradually.
Rv Rubber Roof Replacement Cost Placentia, CA
When you make use of Fluid Rubber Sealant products, make sure to very carefully comply with the application instructions. These will show just how lengthy the item takes to heal to make sure that you can arrange the application around climate patterns where you live. You must inspect your RV roof and the rest of the car every six months to capture tiny issues prior to they become big, expensive ones.
Concerning every two to 4 years is optimal, depending on the kind of weather you have and the type of setting you drive with on a routine basis. Specific sort of environments can create even more deterioration on the roofing than others. And always, after a big storm or heavy snow, evaluate the roof covering for damage.
While some indications that your RV roofing is harmed or has a leakage are apparent, such as water streaming in during a rainstorm, other indicators of damages may not be as conveniently evident. Understanding what to try to find can make your examinations extra reliable and bring your attention to troubles when they're tiny adequate to be a rather quick and low-cost repair service.
And, when you use Fluid Rubber Sealcoat products, you know that you're using the most effective products with the toughest track record. Rubber Roof For Camper Placentia.
Repair Rv Roof Leak Placentia, CA
The thought of changing your motor home's roofing might be at the top of your potential RVing headaches. The entire procedure can be complicated, expensive, and time consuming. If you go in knowing what to expect, it will be much less difficult, and you'll finish up with a shiny new roofing giving peace of mind out on the road.
I worried concerning the prospective expense, and I wondered that to rely on with such a crucial job. Fortunately, my recreational vehicle roofing replacement went less complicated than I anticipated. If I had recognized what to expect beforehand, I might have spent much less time stressing. How do you understand if your roof needs to be changed? Of program, you might have had a crash or storm-related occasion where it appears probable your roofing system has actually been damaged.
Repair Rv Roof Placentia, CA
Interior damages is a feasible indicator. Check along your ceilings and walls for soft places that may indicate moisture or water leakages. Look for bubbles in the wall surface coverings. Ceiling discolorations or spots of mold or mold and mildew can also suggest water intrusion. If you discover any type of interior damages, the next step is to determine the resource of the leakage.
If you have damages to your RV roof covering, a specialist ought to determine whether you're far better off fixing or replacing the roofing. Roof covering replacements are expensive however supply both value and tranquility of mind.
If another person has actually collapsed into your recreational vehicle, their insurance coverage can potentially cover the substitute. If your service warranty or insurance does not cover your roofing substitute, you will certainly need to pay for it out of pocket. If a guarantee or insurance covers the price, you'll just need to pay the quantity of your deductible.
This relates to other circumstances where damages occurs, usually while the recreational vehicle isn't in operation, such as tornado damage. Your future insurance policy rates may not go up if you're discovered not to be at fault. Unless you're incredibly helpful, you'll likely require to discover a professional to replace your RV roofing.
Rv Rubber Roof Maintenance Placentia, CA
After discovering a fixing store, we went down off our traveling trailer for a preliminary evaluation. In this instance, the insurance really did not send out an adjuster out for an in-person inspection, yet some companies need you to have an adjuster appearance at your Recreational vehicle roofing to confirm the damage.
From there, the roofing technician only supplied one type of roofing, so we didn't have any kind of decisions to make. In some situations, you might have different roof covering options to think about, with each offering distinctive benefits and drawbacks. Once the insurance policy was authorized, the technician reached function. It might take a number of weeks or months to get your motor home's roofing system replaced.
Rubber Roofing For Campers Placentia, CA
After a few brief weeks, our roof covering substitute was complete. Our insurance policy company paid the store straight for whatever aside from our insurance deductible. It was truthfully a a lot easier procedure than I pictured. I was happy to have a good local representative and a nationwide business as a company. A full motor home roofing system replacement normally sets you back several thousand bucks.
If you don't inspect, reseal, and repair your RV roof covering routinely, you will end up with some beautiful horrible water damages. This is something that will quickly reduce the worth of your motor home and might even make it unusable. The good news is, looking after your RV roof is something you can possibly do all on your own.
After regarding ten years, it will additionally be necessary to reseal the entire roofing. To do this, you'll require to climb up onto the roof, yet be extremely cautious when you do.
Rv Roof Repair Placentia, CA
Next, you'll wish to cleanse your roofing system completely, so as to get rid of any type of dirt bits. You can utilize a long handled brush for this, yet never ever make use of a cleaner that has oil solvents or citrus ingredients on your rubber or vinyl roof. These sorts of cleaners will cause long-term damage to the surface.
While you're cleaning, remove any type of debris or old roof covering material, yet take care while you do this as you can easily extend a tear, or perhaps punch a hole with the roof covering. You need to after that dry the roofing system as best as you can. Keep In Mind: Rubber recreational vehicle roof coverings can be really slippery when wet.
After the roofing is clean, you are going to wish to check the joints for holes, splits or peeling, so you can reseal wherever needed. You'll want to make a factor of resealing all seams once a year whether or not they reveal signs of wear.
Rv Roof Leak Repair Placentia, CA
When it comes to selecting the best Recreational vehicle roof covering sealer, you'll desire to think about whether you are repairing a tear, resealing a joint, or sealing the whole roof covering. It can be utilized for place sealing or to reseal every seam on the RV roofing system. Simply clean up the area well and use with a caulk weapon.
Replace Rv Roof Placentia, CA
Comparable to the EPDM system noted above, this finishing product will cover your TPO roofing system and aid it last another 10 years. Before EPDM and TPO, metal was the material of option for RV roofs.
The previously mentioned EternaBond is still king when it comes to repairing small problems on a steel roof covering. RV metal roofing systems do need to be totally resealed from time to time.
Make certain to reseal whenever essential and make a factor of resealing all of the joints as soon as every 12 months or so. You'll require to remove the current roof.
Rv Trailer Roof Repair Placentia, CA
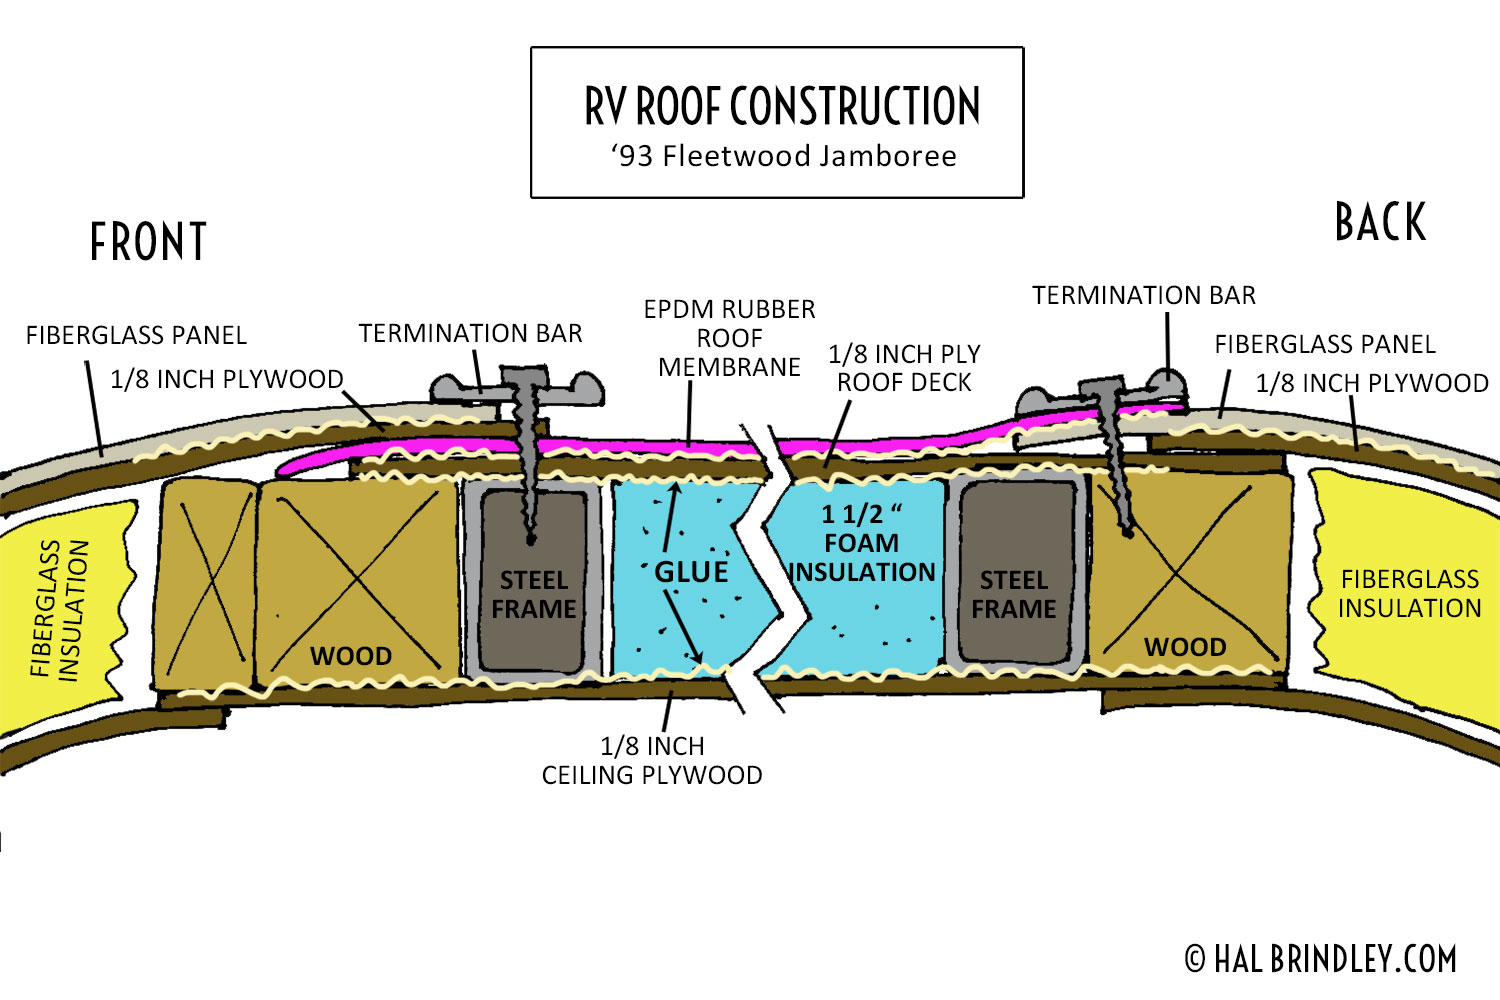
Remove the vent fans, skylights, and air conditioning system. Peel the current layer of rubber back until you see the plywood structure below. Inspect plywood for rot, bowing, mold and mildew, or splintering. Replace harmed items. When the plywood is prepared, it's ideal to cleanse the plywood with something like mineral spirits to get rid of any kind of debris.
Do this in little pieces all along the roof, cutting openings in the rubber roofing for any kind of feature that will go back right into the roof covering. Replace your roofing system's fans, skylights, and A/c device.
In this post, we desire to share with you how to Do it yourself Motor home roof covering repair. Recognizing just how to DIY a great deal of the points that can damage or mess up will certainly save you not just a great deal of cash on RV repairs yet might also save you a great deal of potential time in the shop!
I might get a little payment when you buy using my web link. Read our Disclaimer Policy for more details. We attempt to intend our paths meticulously to avoid low-hanging items over the roadway. Occasionally, however, we find ourselves in unexpected circumstances. This is exactly how we wound up with a few little rips on the roof of our recreational vehicle.
Resealing Rv Roof Placentia, CA
We thought we were clear of the branches, however we wound up capturing a few of them on the far left side of the roof. There were an overall of 4-5 small holes in the side of the roof covering. We really did not check the roofing due to the fact that we really did not think we hit anything.
OCRV Center
Address: 23281 La Palma Ave Yorba Linda, CA 92887Phone: (714) 909-1444
Email: [email protected]
OCRV Center
Among the rips in our motor home roof covering A few weeks later on, we sustained an extreme electrical storm and a great deal of rainfall. Throughout the tornado, we found that we had a tiny quantity of water leaking through among the light fixtures in the bathroom. Fortunately, we did not finish up with any long-term water damage.
Rubber Roofing For Campers Placentia, CARv Rubber Roof Replacement Placentia, CA
Motorhome Roof Replacement Placentia, CA
Rv Slide Out Roof Repair Placentia, CA
Rubber Roof For Camper Placentia, CA
Rv Roof Repair Placentia, CA
Rv Trailer Rubber Roof Repair Placentia, CA
Rv Slide Out Roof Repair Placentia, CA
Rv Roof Leak Repair Placentia, CA
Rv Slide Out Roof Repair Placentia, CA
Rv Trailer Rubber Roof Repair Placentia, CA
Rubber Roof For Rv Placentia, CA
Rubber Roof For Camper Placentia, CA
Repair Rv Roof Placentia, CA
Replace Rv Roof Placentia, CA
Rv Roof Repair Placentia, CA
Rv Roof Maintenance Placentia, CA
Class C Rv Roof Repair Placentia, CA
Rv Roof Repair Placentia, CA
Roof Repair For Rv Placentia, CA
Rv Roof Leak Repair Near Me Placentia, CA
Rv Rubber Roof Maintenance Placentia, CA
Rv Roof Repair Placentia, CA
Rv Trailer Rubber Roof Repair Placentia, CA
Rv Roof Leak Repair Placentia, CA
Rv Roof Repair Placentia, CA
Rv Fiberglass Roof Repair Placentia, CA
Roof Repair For Rv Placentia, CA
Rv Roof Replacement Placentia, CA
Rv Trailer Roof Repair Placentia, CA
Rv Roof Replacement Placentia, CA
Rubber Roofing For Rv Placentia, CA
Class C Rv Roof Repair Placentia, CA
Rubber Roofing For Campers Placentia, CA
Rv Rubber Roof Replacement Cost Placentia, CA
Replace Rv Roof Placentia, CA
Rv Roof Replacement Placentia, CA
Rv Roof Leak Repair Placentia, CA
Rv Trailer Roof Repair Placentia, CA
Rubber Roofing For Rv Placentia, CA
Motorhome Roof Replacement Placentia, CA
Rv Trailer Rubber Roof Repair Placentia, CA
Repair Rv Roof Placentia, CA
Resealing Rv Roof Placentia, CA
Rv Roof Leak Repair Near Me Placentia, CA
Rv Slide Out Roof Repair Placentia, CA
Rubber Roof Installation Placentia, CA
Rv Roof Leak Repair Near Me Placentia, CA
Rv Roof Repair Fiberglass Placentia, CA
Rv Roof Repair Service Near Me Placentia, CA
Best Rv Roof Repair Placentia, CA
Rubber Roof Installation Placentia, CA
Rubber Roofing For Rv Placentia, CA
Rubber Roofing For Campers Placentia, CA
Rubber Roofing For Campers Placentia, CA
Rv Trailer Rubber Roof Repair Placentia, CA
Rv Rubber Roof Maintenance Placentia, CA
Rv Roof Replacement Placentia, CA
Rv Roof Leak Repair Placentia, CA
Rv Roof Repair Service Near Me Placentia, CA
Replace Rv Roof Placentia, CA
Rv Trailer Roof Repair Placentia, CA
Rv Trailer Roof Repair Placentia, CA
Resealing Rv Roof Placentia, CA
Rv Roof Leak Repair Placentia, CA
Rv Slide Out Roof Repair Placentia, CA
Rv Rubber Roof Replacement Cost Placentia, CA
Rv Roof Leak Repair Near Me Placentia, CA
Rv Rubber Roof Replacement Cost Placentia, CA
Class C Rv Roof Repair Placentia, CA
Rubber Roofing For Campers Placentia, CA
Rubber Roofing For Campers Placentia, CA
Repair Rv Roof Placentia, CA
Rv Roof Repair Service Near Me Placentia, CA
Roof Repair For Rv Placentia, CA
Rv Trailer Rubber Roof Repair Placentia, CA
Resealing Rv Roof Placentia, CA
Rubber Roof Installation Placentia, CA
Affordable Seo Service Placentia, CA
Near Here Seo Marketing Agency Placentia, CA
OCRV Center
Table of Contents
- – Rv Roof Repair Near Me Placentia, CA
- – OCRV Center
- – Motorhome Roof Replacement Placentia, CA
- – Rv Roof Repair Near Me Placentia, CA
- – Rubber Roof For Rv Placentia, CA
- – Rv Rubber Roof Replacement Cost Placentia, CA
- – Repair Rv Roof Leak Placentia, CA
- – Repair Rv Roof Placentia, CA
- – Rv Rubber Roof Maintenance Placentia, CA
- – Rubber Roofing For Campers Placentia, CA
- – Rv Roof Repair Placentia, CA
- – Rv Roof Leak Repair Placentia, CA
- – Replace Rv Roof Placentia, CA
- – Rv Trailer Roof Repair Placentia, CA
- – Resealing Rv Roof Placentia, CA
- – OCRV Center
Latest Posts
Rv Paint Job Mira Loma
Rv Wall Repair Diamond Bar
Health Insurance Plans For Students Rancho Santa Margarita
More
Latest Posts
Rv Paint Job Mira Loma
Rv Wall Repair Diamond Bar
Health Insurance Plans For Students Rancho Santa Margarita