All Categories
Featured
Table of Contents
- – Norcold Refrigerator Repair Fullerton, CA
- – OCRV Center
- – Rv Repair Shops Near Me Fullerton, CA
- – Rv Fridge Repair Fullerton, CA
- – Norcold Repair Fullerton, CA
- – Rv Repair Shops Fullerton, CA
- – Norcold Repair Fullerton, CA
- – Rv Engine Repair Near Me Fullerton, CA
- – Rv Mechanic Fullerton, CA
- – Emergency Rv Repair Near Me Fullerton, CA
- – Rv Repair Shop Near Me Fullerton, CA
- – Norcold Refrigerator Repair Fullerton, CA
- – Motorhome Air Conditioner Repair Fullerton, CA
- – Rv Air Conditioning Repair Near Me Fullerton...
- – Rv Repair Shops Fullerton, CA
- – OCRV Center
Norcold Refrigerator Repair Fullerton, CA
New insulation can additionally be positioned on top if needed. Be recommended that getting rid of the existing membrane will certainly set off Building regulations Component L, which would certainly need a full roofing and insulation upgrade and substitute (Fullerton Rv Windshield Repair Near Me). Leakages are spotted in several areas of the level roofing membrane layer As above, the cause could be an age-related break down of the membrane or slits
Fixing your gutters should be a number one priority, prior to making any kind of repair work to your flat roofing system. If considerable water access has actually happened, more substantial roof job may be called for.
These can include yet are not restricted to: (1) bad product spec, (2) incorrect or low-grade ingredients, (3) setup during wet or wet conditions and (4) inaccurate design. Ideally, damage to the roof will be fixed prior to the leak has actually spread. Nevertheless, this relies on the size of time that the leak has actually been revealed to rainwater.
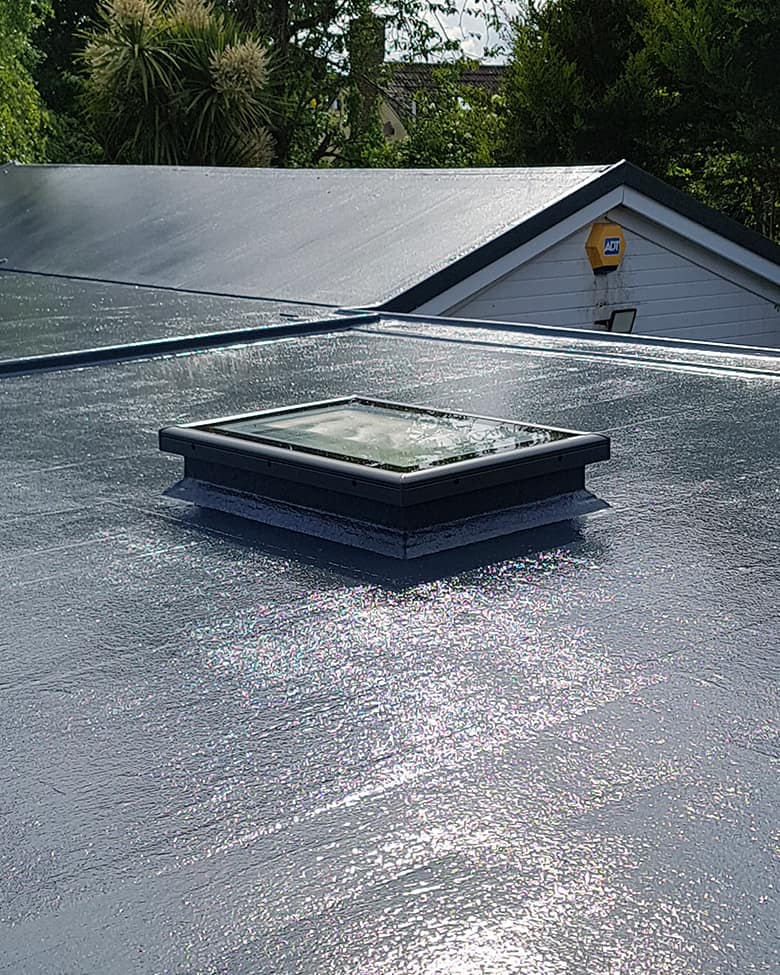
If the roofing is dripping yet there is no evident indication, it is possible that the boundary outlining is the source. This might be the lead blinking or the fact that the edge trims are subjecting the roof structure (an usual reason of dripping when it rains with wind). The following gallery is meant to reveal several of the dripping flat roofing systems come across by Strandek.
Rv Repair Shops Near Me Fullerton, CA
Side sight picture revealing a poorly mounted EDPM solitary ply rubber roof covering. The roof covering has a dent in the rubber and is not effectively glued to the wood decking. Likely cause is improperly fitted safety and security light which has allowed water access via paint and fittings. Gradually weight of device cantilevered off face has actually prised open grain of wood advertising prolonged break down of surface.
Clean with acetone and use new layer of flow layer at max price of 0.5 Kg/sq. Plainly reveals second application of circulation having actually been straight used to unprepared existing circulation layer.
Furthermore, the surface structure of the laminate generally is very poor and inconsistent suggesting reduced skill degrees in this area. Suggests that base resin and matting have actually been applied however without combining with a paddle roller leaving an unacceptable look to the roof covering with adjoining layers generating increased degrees.
The entire roofing surface area should be completely sanded back to break with the existing flow layer surface area, removing any lips and bumps. Not necessarily a leak, but can lead to one.
Rv Fridge Repair Fullerton, CA
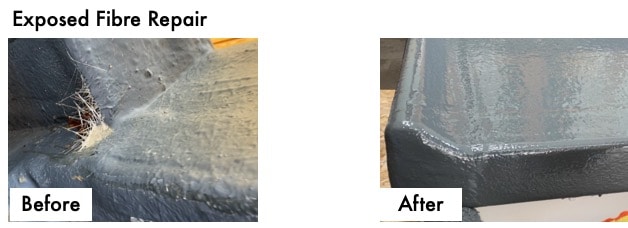
Roof is harmful work. The complying with area supplies a general overview on just how to repair a fibreglass level roof making use of a fibreglass repair set.
Fibreglass (GRP) roof covering packages are offered in a series of sizes. They include enough materials and devices required to make an effective repair work. Keep in mind: when taking into consideration any type of roof job, security must be a major variable. There are a number of risk aspects that must be taken into consideration as part of a danger evaluation.
Even more information on these are laid out below. Note: Whilst fibreglass roof covering repair sets are functional and ideal for a range of roof covering structures. Check the surfaces that the fibreglass repair can be made to. Fibreglass bonds to plywood, lumber and existing fibreglass. make certain that appropriate surface preparation has actually been executed.
Norcold Repair Fullerton, CA
Thinking the underlying framework has actually been repaired and remains in good physical condition, several actions must be complied with: this suggests locating any type of infiltration in the existing roof covering membrane. Generally, if the leak is even more of a puncture that's occurred just recently and with little to no rainfall, it can be covered over the below standards use here.
In such an instance, a complete replacement is needed. Keep in mind: permit the roof covering to dry out. Prior to starting any kind of job the roof covering location should be completely dry. Moist or damp regions ought to be enabled to dry out. Note: it is suggested to cover this area in a plastic cover throughout periods of rains till it can be fixed.
Keep in mind: attempts to bond the resin to a wet or wet surface area ought to be prevented as this will restrict bond considerably. roof covering membrane around the repair area that is loosened, contaminated or damaged need to be examined for damage and got rid of accordingly. Use sandpaper to downsize the membrane layer to create a flatter surface area before repair.
Primers are developed to help with bonding in between the substratum (e.g. existing fibreglass or plywood) and the fibreglass laminate. Apply guide in a slim layer over the fixing area. Whilst this is optional, it does boost the adhesion of the polyester resin to the region undertaking repair work. PorosityPrimer Protection (kg per m2)ToolNote Low Porosity0.25 Polyester rollers (bigger locations) or a resin brushes (smaller/complex areas) advised.
Rv Repair Shops Fullerton, CA
High Porosity > 0.5 If porosity is high, after that a lot more primer is needed, given that the fluid will certainly enter right into the pores. size and reduced the CSM. Thus, 600 gram CSM is suggested, although lighter 450 g CSM is likewise offered. Applicators need to reduce and size the CSM into a size that surpasses the existing area of the repair service region by around 10 20 %.
Note: freshly catalysed resin should be made use of right away. Keep in mind: make sure that the resin-catalyst mixture is carefully however fully mixed.
Norcold Repair Fullerton, CA
Excess air creates bubbles, which compromise the laminate. Keep in mind: this step should be carried out when the climate is completely dry; water and also low levels of wetness interfere with the healing process.
Recommended time: 12 hours (winter season) and 6 hours (summertime). Shield the repair service with sufficient coverage in case of rains. as soon as the laminate has hardened, prepare the overcoat. This involves mixing it with a driver thoroughly to avoid bubble development. Keep in mind: to match the colour of your overcoat, use a dye.
Rv Engine Repair Near Me Fullerton, CA
To prepare the overcoat: put a single layer of overcoat material onto the laminated concrete surface area. Take care to stay clear of applying too much as this will certainly create a weak external surface area.
Surface area Location (m2)Topcoat Weight (kg) 10.5 21 31.5 42.0 52.5 Note: describe the maker's directions, however a harsh quote would recommend 0.5 kg per square meter of laminate. If you would love to purchase a repair package without overcoat, please see our Fibreglass Repair work Kits. once the topcoat has been used, offer adequate time for it to heal and set.
Rv Mechanic Fullerton, CA
Provide sufficient coverage and waterproofing in case of rainfall. A number of regulations matter when considering the building and construction of a flat roofing system. These apply to fibreglass (GRP) level roofings as well as other systems like really felt, EPDM and asphalt. Some repair work to flats roofings will certainly not require an application for approval under the Structure Regulations.
Working on a flat roof threatens and treatment should be taken to make certain the safety and security of all parties involved. The UK HSE provides support on the following hazards linked with flat roof job: Asbestos is a significant consideration in roof specifically on structures set up pre-2000, where it was still used.
Emergency Rv Repair Near Me Fullerton, CA
Chemicals: polyester material and MEKP stimulant offer some level of threat.
Usually, it would certainly be a good idea to utilize the same product to fix the roofing. If the fixing included the total removal of the existing membrane layer, after that fibreglass can be made use of. A basic fibreglass flat roofing installment price is around 60 80 per square meter. Material Library offers detailed overviews are readily available online for installers covering exactly how to build a fibreglass roofing system from the ground up.
From here, you can take the following steps to ensure a watertight surface. meticulously to determine signs of damage and plan a repair strategy appropriately. to guarantee a strong bond between the old roofing and the new repair material. according to the producer's directions and apply it to the damaged location, loading it in completely.
Rv Repair Shop Near Me Fullerton, CA
With your products all set and damages analysis full, it's time to prepare the flat roof covering for fixing by cleaning and keying the area around the damages. This step is crucial in guaranteeing a solid bond in between the old roofing and the new fixing product. To prepare the location, you'll need to utilize a disc sander to clean down the edges of the repair work zone and get rid of obtrusive damages product.
Validate the surface area is tidy, dry, and cost-free of pollutants prior to using the repair combination. Cleaning the repair work area entails two vital steps: First, make use of a disc sander to remove noticeable damage material and smooth out the sides of the fixing zone.
As you sand, make sure not to sand down past the fibreglass under-layer. You'll wish to clean a location of regarding 2-3 inches in area around the damages to key the area. Next off, grab some Acetone and clean the location to eliminate any type of blockages. This will guarantee a strong bond in between the new material and the existing roof.
Norcold Refrigerator Repair Fullerton, CA
By doing so, you'll be producing a solid foundation for the repair work. Currently that the repair work location is tidy and without particles, it's time to mix the repair work blend that will bond with the existing roof covering. This mix is crucial to a successful fixing, as it will certainly fill up in the damaged area and offer a solid, watertight seal.
Stir the combination completely until it's smooth and consistent. If you're making use of a fiberglass mat or chop hair, sufficed to dimension and include it to the blend, ensuring it's totally saturated. Currently that your repair service mixture prepares, you're one action more detailed to a successful roofing repair work. Using the newly combined repair service blend to the damaged area, you'll desire to load it in totally, ensuring to press it securely right into the sides and corners to get rid of any kind of air pockets.
Motorhome Air Conditioner Repair Fullerton, CA
Ensure to fill the area somewhat above the bordering surface, as the mixture will certainly diminish a little as it dries. Use a degree or straightedge to verify the filled location is also and smooth. If required, make use of a moist towel to eliminate any excess combination that has actually pressed out beyond the broken area.
With your products prepared and damage analysis total, it's time to prepare the flat roof covering for repair service by cleaning and keying the location around the damages. This step is important in ensuring a solid bond in between the old roofing and the new repair material. To prepare the area, you'll need to utilize a disc sander to cleanse down the edges of the repair service area and get rid of meddlesome damages material.
Sand a location of 2-3 inches in circumference around the damages to key the zone, however prevent sanding down past the fibreglass under-layer. Prepare the area for bonding by eliminating any type of obstructions. Validate the surface is clean, dry, and without impurities prior to applying the repair combination. Cleaning up the repair service location involves two necessary actions: First, make use of a disc sander to remove obtrusive damage material and smooth out the edges of the fixing area.
Rv Air Conditioning Repair Near Me Fullerton, CA
As you sand, ensure not to sand down past the fibreglass under-layer. You'll want to cleanse a location of regarding 2-3 inches in area around the damage to key the zone. Next off, get some Acetone and clean the area to get rid of any obstructions. This will assure a solid bond in between the brand-new material and the existing roof.
By doing so, you'll be producing a solid structure for the repair. Currently that the repair area is clean and free of particles, it's time to mix the repair work combination that will certainly bond with the existing roofing. This mixture is vital to an effective repair work, as it will fill out the broken area and provide a solid, water tight seal.
Rv Repair Shops Fullerton, CA
Currently that your repair blend is ready, you're one step closer to a successful roofing repair service. Using the fresh mixed repair service combination to the broken area, you'll want to load it in entirely, making certain to press it strongly right into the edges and corners to eliminate any type of air pockets.
OCRV Center
Address: 23281 La Palma Ave Yorba Linda, CA 92887Phone: (714) 909-1444
Email: [email protected]
OCRV Center
Make specific to fill up the location slightly over the surrounding surface area, as the combination will certainly reduce a little as it dries out. Use a degree or straightedge to validate the loaded location is even and smooth. If required, make use of a wet towel to remove any type of excess blend that has actually ejected past the broken area.
Rv Mechanic Fullerton, CARv Windshield Repair Near Me Fullerton, CA
Norcold Rv Refrigerator Repair Fullerton, CA
Motorhome Air Conditioner Repair Fullerton, CA
Rv Air Conditioning Repair Fullerton, CA
Rv Engine Repair Near Me Fullerton, CA
Rv Repair Shops Fullerton, CA
Rv A/C Repair Near Me Fullerton, CA
Norcold Refrigerator Repair Fullerton, CA
Rv Mechanic Fullerton, CA
Emergency Rv Repair Near Me Fullerton, CA
Motorhome Repair Shop Near Me Fullerton, CA
Rv Service And Repair Fullerton, CA
Rv Air Conditioner Repair Fullerton, CA
Rv Mechanic Fullerton, CA
Rv Repair Shops Fullerton, CA
Rv Repair Shops Near Me Fullerton, CA
Rv Windshield Repair Fullerton, CA
Onan Generator Repair Fullerton, CA
Motorhome Repair Shop Near Me Fullerton, CA
Rv Air Conditioner Repair Fullerton, CA
Rv Repair Shops Fullerton, CA
Norcold Refrigerator Repair Fullerton, CA
Rv Generator Repair Near Me Fullerton, CA
Rv A/C Repair Near Me Fullerton, CA
Rv Windshield Replacement Fullerton, CA
Motorhome Air Conditioner Repair Fullerton, CA
Rv Windshield Repair Near Me Fullerton, CA
Norcold Refrigerator Repair Fullerton, CA
Rv A/C Repair Near Me Fullerton, CA
Rv Windshield Repair Near Me Fullerton, CA
Fiberglass Roof Repair Fullerton, CA
Rv Mechanic Near Me Fullerton, CA
Rv Repair Shop Near Me Fullerton, CA
Motorhome Generator Repair Fullerton, CA
Rv Window Repair Near Me Fullerton, CA
Rv A/C Repair Near Me Fullerton, CA
Rv Windshield Repair Near Me Fullerton, CA
Rv Windshield Replacement Fullerton, CA
Onan Generator Repair Fullerton, CA
Rv Service And Repair Fullerton, CA
Rv Window Repair Near Me Fullerton, CA
Rv Window Repair Fullerton, CA
Norcold Rv Refrigerator Repair Fullerton, CA
Motorhome Air Conditioner Repair Fullerton, CA
Motorhome Air Conditioner Repair Fullerton, CA
Rv Window Repair Near Me Fullerton, CA
Rv Windshield Repair Fullerton, CA
Dometic Refrigerator Repair Fullerton, CA
Rv Service And Repair Fullerton, CA
Rv Repair Shop Near Me Fullerton, CA
Rv Air Conditioning Repair Near Me Fullerton, CA
Rv Service And Repair Fullerton, CA
Rv Fridge Repair Fullerton, CA
Rv Repair Shops Fullerton, CA
Motorhome Repair Shop Near Me Fullerton, CA
Rv Air Conditioning Repair Fullerton, CA
Dometic Refrigerator Repair Fullerton, CA
Rv Windshield Replacement Fullerton, CA
Emergency Rv Repair Near Me Fullerton, CA
Rv Repair Shop Near Me Fullerton, CA
Rv Windshield Replacement Fullerton, CA
Norcold Repair Fullerton, CA
Norcold Rv Refrigerator Repair Fullerton, CA
Rv Air Conditioning Repair Fullerton, CA
Rv A/C Repair Near Me Fullerton, CA
Rv Windshield Repair Fullerton, CA
Rv Windshield Replacement Fullerton, CA
Rv Air Conditioning Repair Near Me Fullerton, CA
Rv Generator Repair Near Me Fullerton, CA
Norcold Refrigerator Repair Fullerton, CA
Emergency Rv Repair Near Me Fullerton, CA
Rv Air Conditioning Repair Fullerton, CA
Rv Repair Shop Near Me Fullerton, CA
Norcold Repair Fullerton, CA
Rv Ac Repair Fullerton, CA
Rv Engine Repair Near Me Fullerton, CA
Rv Window Repair Fullerton, CA
Find A Good Local Seo Packages Fullerton, CA
Near Me Seo Services Fullerton, CA
Rv Windshield Repair Near Me Fullerton, CA
OCRV Center
Table of Contents
- – Norcold Refrigerator Repair Fullerton, CA
- – OCRV Center
- – Rv Repair Shops Near Me Fullerton, CA
- – Rv Fridge Repair Fullerton, CA
- – Norcold Repair Fullerton, CA
- – Rv Repair Shops Fullerton, CA
- – Norcold Repair Fullerton, CA
- – Rv Engine Repair Near Me Fullerton, CA
- – Rv Mechanic Fullerton, CA
- – Emergency Rv Repair Near Me Fullerton, CA
- – Rv Repair Shop Near Me Fullerton, CA
- – Norcold Refrigerator Repair Fullerton, CA
- – Motorhome Air Conditioner Repair Fullerton, CA
- – Rv Air Conditioning Repair Near Me Fullerton...
- – Rv Repair Shops Fullerton, CA
- – OCRV Center
Latest Posts
Mobility Van Repair Near Me Montclair
East Irvine Rv Body Shop
Silverado Pop Up Camper Roof Replacement
More
Latest Posts
Mobility Van Repair Near Me Montclair
East Irvine Rv Body Shop
Silverado Pop Up Camper Roof Replacement