All Categories
Featured
Table of Contents
- – Resealing Rv Roof Tustin, CA
- – OCRV Center
- – Rv Rubber Roof Repair Tustin, CA
- – Rv Roof Repair Near Me Tustin, CA
- – Repair Rv Roof Tustin, CA
- – Rv Roof Leak Repair Tustin, CA
- – Repair Rv Roof Leak Tustin, CA
- – Rv Rubber Roof Replacement Tustin, CA
- – Roof Repair For Rv Tustin, CA
- – Rv Roof Repair Near Me Tustin, CA
- – Rv Rubber Roof Repair Tustin, CA
- – Epdm Rv Roof Repair Tustin, CA
- – Rv Fiberglass Roof Repair Tustin, CA
- – Rv Roof Leak Repair Near Me Tustin, CA
- – OCRV Center
Resealing Rv Roof Tustin, CA
So after ending up the task, Steve and I did a last stroll around. We inspected the seals around every home window, door, trim and air vent to confirm that I really did not miss out on anything. Steve has a score system that he uses on our YouTube channel (go inspect it out, if you haven't yet).
Use brand-new sealer. Okay, and after that the last step is to enjoy a cool beer or soft drink or perhaps the cocktail, "Screwdriver" simply for enjoyable. Put your feet up and rub on your own on the back, since you just saved a great deal of money by doing this job on your own. And currently you're safeguarded against water damages for another year! Connected:.
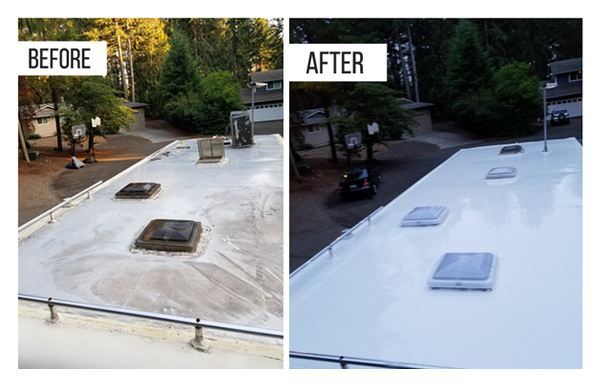
Long term direct exposure to rain, extreme heat, icy temperatures, rough cleansing detergents, tree branches, and also oxidation can create roof seals to deteriorate, bring about water damage. If you're questioning how to correctly seal a RV roofing system, this message will certainly walk you via the essential actions. Use our tips to ensure the sealant application process provides long-term protection for many years to find.
Rv Rubber Roof Repair Tustin, CA
Where the front cap fulfills the roofing. Edges and corners of the roof's boundary. The area around the a/c unit(s) and skylight(s). The seals around fixtures, like the roof vent, fridge air vent, dish antenna, and antennas. Around any other devices set up on the roofing. Make use of these steps to clean and reseal the roof of your mobile home: Apply the sealant on a cozy, dry day, ideally with temperatures between 70 and 80 degrees Fahrenheit.
Start by sweeping the roof covering and, voids, and worn-out seals - Tustin Rv Fiberglass Roof Repair. Pay unique focus to locations around roofing vents, skylights, edges, and edges.
Rv Roof Repair Near Me Tustin, CA
Rubber handwear covers. Ladder. Plastic putty knife to eliminate old sealant. The cleaner the location, the better the sealer's call and adhesion. Begin by sweeping the roof covering. Next off, dampen a towel with odor-free mineral spirit to clean up the filthy sealant. Clean with a completely dry towel, concentrating on nooks and edges. If your recreational vehicle roof covering is incredibly filthy, and the sealer is intact, offer it a great cleansing utilizing water, a soft bristle brush, and mild soap.
But if the sealer has terribly damaged areas, prevent utilizing water as it can permeate the splits. If the sealer is still pliable, soft, and easy to press, you can apply new sealant straight ahead. However, if it is old, hard, fractured, bumpy, or uneven, elimination is necessary for an appropriate seal.
Rather, use a putty blade or scratching blade to delicately lift it. For persistent areas, use a warm gun to soften it.
Repair Rv Roof Tustin, CA
Time out until you are all set to apply. Holding the caulking weapon at a 45-degree angle, gradually run the nozzle along the external side and after that the internal sides of the old sealant. Load the area between the 2 lines of sealer with a modest quantity of sealant, while ensuring it is equally dispersed.
Use Dicor non-sag sealer on the brink, and Dicor self-leveling lap sealant on flat locations. The great information is that Dicor lap sealants work on any type of roof type. Don't tackle a big area at as soon as. Apply sealant in convenient sections, concerning one to 2 feet at a time to prevent the sealer from developing a skim layer on the top.
Keep in mind to clean the end of your caulking gun prior to beginning a new section to avoid any build-up that could affect the sealer's efficiency. The drying time can differ based on the sealant type and environmental conditions. Generally, this can take 24 to 2 days. Do not reveal the sealer to any kind of wetness before it dries.
It's a super-sticky, water resistant tape that can last anywhere from 5 to 15 years and features a 15-year warranty. Below's how to use EternaBond. The primary step is to clean the existing sealant and areas around it making use of mineral spirits or water. If the existing sealant is old and broken, remove it and use EternaBond, and afterwards apply new lap sealant around the sides of the EternaBond tape.
Rv Roof Leak Repair Tustin, CA
Cut the length you require for the area you're using, lay it down on the roof, and gradually peel off the backing off. Press down the tape with a little roller as you go to turn on the adhesive for a limited seal. Make certain there are no creases. For more comfort, apply a little bead of lap sealer along the edge of EternaBond tape.
Right here are some commonly asked questions regarding the Recreational vehicle roof securing process. You must reseal your motorhome or trailer roof covering every 2 years, depending on your area's environment and roofing system product.
Repair Rv Roof Leak Tustin, CA
Once the surface area is tidy from particles, you can wipe down the location with Acrysol body de-greaser or mineral spirits to clean the surface area. Acrysol will certainly eliminate any one of the old dust and oils from the roofing system and sealant surface area. If there is anything loose, you will certainly require to eliminate it before sealing.
When everything is secured appropriately, then you are prepared to start the resealing procedure. As soon as you have the sealers cleansed to your preferred degree, you can after that start the sealing process. Thank you, Dustin.
Rv Rubber Roof Replacement Tustin, CA
The very first step is selecting the appropriate sealant, which depends on the material of your RV roofing. The majority of modern Recreational vehicles have roofs made from rubber, as this product is specifically resilient, yet older vehicles typically have metal or fiberglass roofs. When choosing a sealant, the very first thing you require to do is guarantee that it is suitable with the material of your recreational vehicle roofing system.
The steps for these can differ based on your roofing system type, so it's important to understand the material your own is made of. Once you know that, you can discover to carry out an recreational vehicle roof covering fixing. If your rubber roofing is flaking or looks chalky, it most likely needs a new coat of sealant.
Roof Repair For Rv Tustin, CA
A fiberglass roof can be resealed with Motor home Roofing system Magic, just like a rubber roof. Prior to you cleanse the roof covering, scratch any loosened, crinkled items of fiberglass coating off.

Apply the Recreational vehicle Roof covering Magic to the whole roof with a roller. RV Roofing system Magic can also be applied to aluminum and various other metal roofings.
One more vital part of recreational vehicle roof repair is resealing joints. The steps for this are virtually the exact same for all roofing products when you use Butyl MS Caulk for the resealing. Initially, clean the surface area of any kind of particles to make sure correct bond. This includes dirt, frost, oil, oils, and corrosion.
The caulk will certainly be healed in 24 hours and be totally cured in 7 to 14 days. If you find an opening or tear in your motor home roofing, you'll need to repair it with Poly Textile, Seam Tight, and Seam Tape, depending upon the kind of tear. Joint tape can be applied by aligning the two adjacent areas that require to be secured and placing the tape on them.
Rv Roof Repair Near Me Tustin, CA
You can put it onto wet Joint Tight, which will adhere and turn into one with the product. You can use Recreational vehicle Roofing Magic over that area and the remainder of the roof to make certain the joint never ever comes apart again. Motor home roof covering repair can be daunting if you don't understand where to begin.
It is an easy and economical task for any kind of Diy recreational vehicle owner. Here's what you require to understand. Evaluate the seals and inspect for water damage prior to buying any recreational vehicle, also new ones. If you locate poor seals, it can signal a prospective water invasion trouble. Once you are confident that the RV is effectively sealed, then I would certainly advise rechecking them at the very least yearly.
This window seal will allow water enter Pay special attention to joints on the top and sides. They are more susceptible to wear and leak considering that they get most of water overflow from the roof.:. Rusty screws that secure wall surface panels, lights, and various other openings are an indication that dampness is behind the external wall.
One locations usually missed out on is following to the awning. Right here's a Relocating within, water damages around windows can cause swelling, staining or possibly mold and mildew in the bordering wall paneling.
Rv Rubber Roof Repair Tustin, CA
Water dripping from the top of a window usually runs down the side of the home window right into the paneling around the lower corners. Once you have actually recognized what areas require to be resealed, adhere to these actions to get an expert result. Utilize the pointy and level end of a scrape to eliminate all existing sealant.
Mineral spirits can assist chill out residual sealer after the first scrape. Put some on a rag clean the around the area providing it a couple of minutes to do its magic prior to continuing. Make use of a scrape to get rid of old sealant If you're fretted about damaging your paint job, after that I 'd recommend using a plastic scrape.
Epdm Rv Roof Repair Tustin, CA
An utility blade functions well for this. This step is critical to obtaining a correct seal. Spray on some home window cleaner and utilize a clean cloth or shop towel to clean up the area. The window cleaner will certainly cleanse it up well and vaporize quicker. Clean surface effectively prior to using new sealant Dry the whole area with a towel prior to carrying on.
Tape around home window structure leaving 1/8 boundary for sealer What kind of sealer to utilize? Everybody has their favored sealer for each type of surface area and application.
I prefer the clear 100% silicone sealant from my local store because it functions excellent and can be found in a press tube. I like a clear silicon in a capture tube due to the fact that it's easier to apply in tiny areas functions good too and is a bit a lot more expensive. I do keep a number of tubes of ProFlex handy yet primarily utilize it in various other locations.
Rv Fiberglass Roof Repair Tustin, CA
This home window seal will let water get in Pay special attention to joints on the top and sides. They are much more prone to wear and leakage since they get the majority of water overflow from the roof.:. Rusty screws that secure wall panels, lights, and various other openings are an indicator that dampness is behind the external wall surface.
Pay additional attention to those places. If your not sure where those are, search for streaking along the sides. One areas typically missed out on is beside the awning. Here's a Relocating inside, water damage around windows can cause swelling, discoloration or possibly mold in the bordering wall surface paneling. Execute a visual assessment then press the surface area around the home window checking for soft qualities.
Water dripping from the top of a window frequently runs down the side of the home window right into the paneling around the reduced edges. As soon as you have actually recognized what areas require to be resealed, follow these steps to get a professional outcome. Use the pointy and flat end of a scrape to remove all existing sealant.
Rv Roof Leak Repair Near Me Tustin, CA
Mineral spirits can aid loosen up residual sealant after the first scrape. Put some on a rag clean the around the area giving it a few mins to do its magic prior to proceeding. Make use of a scrape to get rid of old sealant If you're bothered with damaging your paint job, then I 'd recommend using a plastic scraper.
An utility knife works well for this. This step is important to getting a proper seal. Spray on some home window cleaner and make use of a clean cloth or store towel to clean the location. The window cleaner will cleanse it up nicely and evaporate quicker. Clean surface area extremely well prior to using brand-new sealer Dry the whole location with a towel before carrying on.
It will be time consuming instead of just totally free handing it. Believe me, the additional effort will certainly deserve it. Leave a tiny space of around 1/8 inch between the window frame and tape for sealant. Tape around home window framework leaving 1/8 boundary for sealer What type of sealer to make use of? Everyone has their preferred sealant for each sort of surface and application.
OCRV Center
Address: 23281 La Palma Ave Yorba Linda, CA 92887Phone: (714) 909-1444
Email: [email protected]
OCRV Center
I favor the clear 100% silicone sealant from my regional store due to the fact that it functions wonderful and comes in a squeeze tube. I choose a clear silicon in a capture tube since it's less complicated to apply in small locations functions great as well and is a little bit extra costly. I do keep a pair of tubes of ProFlex useful yet mostly use it in various other locations.
Epdm Rv Roof Repair Tustin, CARubber Roofing For Rv Tustin, CA
Replace Rv Roof Tustin, CA
Rv Roof Repair Fiberglass Tustin, CA
Rv Roof Repair Fiberglass Tustin, CA
Rubber Roof For Rv Tustin, CA
Rv Rubber Roof Replacement Cost Tustin, CA
Rv Roof Leak Repair Tustin, CA
Resealing Rv Roof Tustin, CA
Rv Rubber Roof Repair Tustin, CA
Rubber Roofing For Rv Tustin, CA
Rv Rubber Roof Repair Tustin, CA
Rv Trailer Roof Repair Tustin, CA
Rv Rubber Roof Repair Tustin, CA
Rv Roof Repair Near Me Tustin, CA
Rv Roof Repair Fiberglass Tustin, CA
Repair Rv Roof Leak Tustin, CA
Rv Roof Repair Service Near Me Tustin, CA
Rv Rubber Roof Repair Tustin, CA
Rubber Roof For Camper Tustin, CA
Rv Roof Repair Tustin, CA
Rv Trailer Rubber Roof Repair Tustin, CA
Resealing Rv Roof Tustin, CA
Rv Roof Repair Near Me Tustin, CA
Rv Roof Repair Tustin, CA
Rv Roof Repair Tustin, CA
Rv Trailer Roof Repair Tustin, CA
Best Rv Roof Repair Tustin, CA
Rv Slide Out Roof Repair Tustin, CA
Rv Roof Leak Repair Tustin, CA
Rv Roof Repair Fiberglass Tustin, CA
Rubber Roof For Rv Tustin, CA
Rubber Roofing For Rv Tustin, CA
Repair Rv Roof Leak Tustin, CA
Rubber Roofing For Campers Tustin, CA
Rv Roof Leak Repair Tustin, CA
Rv Roof Leak Repair Tustin, CA
Class C Rv Roof Repair Tustin, CA
Rv Trailer Roof Repair Tustin, CA
Rv Roof Repair Service Near Me Tustin, CA
Replace Rv Roof Tustin, CA
Rv Slide Out Roof Repair Tustin, CA
Rv Rubber Roof Replacement Tustin, CA
Rv Fiberglass Roof Repair Tustin, CA
Roof Repair For Rv Tustin, CA
Roof Repair For Rv Tustin, CA
Motorhome Roof Replacement Tustin, CA
Rubber Roof For Rv Tustin, CA
Rubber Roof For Rv Tustin, CA
Rv Roof Repair Near Me Tustin, CA
Rubber Roofing For Campers Tustin, CA
Rv Roof Repair Tustin, CA
Repair Rv Roof Leak Tustin, CA
Rv Roof Repair Service Near Me Tustin, CA
Rv Roof Leak Repair Tustin, CA
Rv Rubber Roof Replacement Cost Tustin, CA
Rubber Roofing For Campers Tustin, CA
Class C Rv Roof Repair Tustin, CA
Replace Rv Roof Tustin, CA
Repair Rv Roof Leak Tustin, CA
Best Rv Roof Repair Tustin, CA
Rv Roof Repair Tustin, CA
Rubber Roof For Camper Tustin, CA
Rubber Roofing For Campers Tustin, CA
Rv Rubber Roof Replacement Tustin, CA
Rv Roof Repair Service Near Me Tustin, CA
Replace Rv Roof Tustin, CA
Rv Rubber Roof Repair Tustin, CA
Roof Repair For Rv Tustin, CA
Replace Rv Roof Tustin, CA
Rv Roof Leak Repair Near Me Tustin, CA
Rv Roof Repair Near Me Tustin, CA
Rv Slide Out Roof Repair Tustin, CA
Epdm Rv Roof Repair Tustin, CA
Class C Rv Roof Repair Tustin, CA
Roof Repair For Rv Tustin, CA
Roof Repair For Rv Tustin, CA
Repair Rv Roof Leak Tustin, CA
Finding A Good Local Seo Package Tustin, CA
Find Seo Tustin, CA
Rv Fiberglass Roof Repair Tustin, CA
OCRV Center
Table of Contents
- – Resealing Rv Roof Tustin, CA
- – OCRV Center
- – Rv Rubber Roof Repair Tustin, CA
- – Rv Roof Repair Near Me Tustin, CA
- – Repair Rv Roof Tustin, CA
- – Rv Roof Leak Repair Tustin, CA
- – Repair Rv Roof Leak Tustin, CA
- – Rv Rubber Roof Replacement Tustin, CA
- – Roof Repair For Rv Tustin, CA
- – Rv Roof Repair Near Me Tustin, CA
- – Rv Rubber Roof Repair Tustin, CA
- – Epdm Rv Roof Repair Tustin, CA
- – Rv Fiberglass Roof Repair Tustin, CA
- – Rv Roof Leak Repair Near Me Tustin, CA
- – OCRV Center
Latest Posts
Truck Fleet Services Anaheim
Rv Trailer Repair Shop Orange County
Rv Service And Repair Near Me Riverside
More
Latest Posts
Truck Fleet Services Anaheim
Rv Trailer Repair Shop Orange County
Rv Service And Repair Near Me Riverside