All Categories
Featured
Table of Contents
- – Garage Exhaust Fan Universal City, CA
- – Instant Air Solutions
- – Carbon Monoxide Detector Installation Universa...
- – Garage Fume Extractor Universal City, CA
- – Commercial Exhaust Fan Installation Universal...
- – Garage Ventilation Installers Near Me Univers...
- – Exhaust Fan Installers Near Me Universal Cit...
- – Garage Exhaust Fan Universal City, CA
- – Exhaust Fan Installers Near Me Universal Cit...
- – Professional Roof Ventilation Services Unive...
- – Instant Air Solutions
Garage Exhaust Fan Universal City, CA
I have actually had garage air flow on my mind for some time now. In between Eileen and I constantly doing jobs in the garage, we produce a great deal of fumes from paint and discoloration.
This was not the ideal service. Many paint and discoloration tasks would certainly being in the garage over night filling the air with fumes, just to be broadcast out when the sunlight turned up and when we can open the garage doors. Other than the harmful smells resting in the garage the following morning, it would additionally delay the completion of these projects.
Even much more factor to look right into garage air flow systems. I place my thinking cap on and wandered around the garage looking for ventilation ideas.
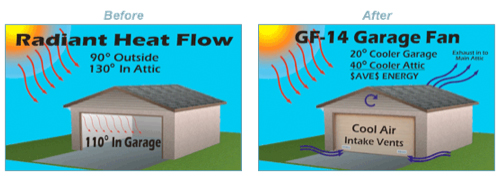
In my previous home, I used to run a great deal of computer system devices in the garage that would generate a great deal of warmth. I had actually researched garage airing vent options at that time and decided on a tiny fan and vent that could be mounted directly in the garage door (via a small opening that you reduced).
Carbon Monoxide Detector Installation Universal City, CA
During the winter season, the garage door vent would let all the chilly air in and drop the garage temperature level listed below the freezing factor, damaging my paints and other liquids that were not meant to be frozen. The garage door vents and exhaust choice left a negative preference in my mouth since, and I was determined not to seek that direction again.
I ultimately decided on a method of airing vent the garage. I would find a suitable airing vent place in the garage, and reduced a big square hole in the wall surface (about 14"x14" in between the wall surface studs). I would certainly set up self-closing shutter vents on both the interior and outside of the wall surface.
Garage Fume Extractor Universal City, CA
The dual shutter vents were going to be vital in helping to keep the cold air outside throughout the winter season. I did a great deal of research on exhaust followers and determined on one with integrated shutters.
For the exterior wall, I went a 14" aluminum shutter air vent (Garage Wall Exhaust Fan Universal City). With the hardware determined, I sought a perfect area for the air vent. The very best place would have been above one of the garage doors, yet for appearances, I didn't want the vent to be noticeable from the road
Right here's the area I chose inside for the garage exhaust follower: Right here's where the vent would wear down outside: Above, you'll see the initial layer I went through was the drywall. Next was the white vinyl siding.
The cutout obtained a little harsh at a few of the sides, yet it was not a big bargain. The follower would certainly cover all the edges, and conceal any type of irregularities in my cut. Next off, I needed to seal the leading and bottom sides of the opening. This was a required action to avoid the fan from venting air right into the wall.
Commercial Exhaust Fan Installation Universal City, CA

I could not simply cut a hole in the siding, put the air vent, and call it a day. To maintain water from passing through the home siding, I needed to use J network. This would enable me to produce a framework around the air vent that would certainly overlap the home siding and protect the rough-cut edges from water.
I followed some terrific directions on (under the area "Mount J-channel around the home window"). Here's a picture revealing the constructed J network items wrapping around the vent: Now came the enjoyable job of dealing with the house siding. To effectively set up the outside air vent, I required access to the wall surface beneath the exterior siding, which meant removing several items of house siding.
, I was able to easily remove some exterior siding, and draw it away from the wall surface. With sufficient of the exterior siding out of the means, I was able to continue work on the hole.
Garage Ventilation Installers Near Me Universal City, CA
Next off, I inserted the shutter vent and nailed it in the wall surface studs. Here's an image showing some progression: With the garage vent in place, I affixed the J channel structure, overlapping the rough cut sides of the vinyl siding.
I inserted the exhaust fan in the hole and was getting ready to screw it right into the studs. I determined to inspect the vents on the fan to make sure they opened up and shut properly.
After some fiddling, I found that the hole I cut was as well snug of a suitable for the fan frame. It was misshaping the frame ever so slightly to cause the shutters to not shut effectively. If I drew the follower regarding 2 inches out from the wall surface, the shutters worked fine.
I would certainly constructed a 24 wood structure in between the wall surface and the fan, to offer the exhaust fan sufficient distance from the opening for the shutters to operate appropriately. I actually spent just 10 mins on this job I cut some 2x4s to size with the miter saw. Then I affixed them to each other with pocket hole screws to create a structure.
Exhaust Fan Installers Near Me Universal City, CA
Right here's a photo of the garage wall exhaust follower framework (the pocket holes are hidden on the other side): At last, the exhaust fan might be bolted to the wall surface. I pressed the fan against the 24 framework and made sure the shutters opened up and shut openly. Then I connected the follower to the 2x4s with some sturdy screws.
I stood back, admired my workmanship and after that terminated up the exhaust fan with my cordless switch. As the fan speed boosted to complete, both the within and outdoors shutters opened up to wear down the garage. The fan was not that loud either (it was hardly distinct outside the garage). Here's a picture of the installed garage wall surface exhaust follower (powered on) from the within: Below's a photo of the beyond the garage wall surface exhaust follower, showing the vents open with the fan on: I'm extremely excited about our brand-new garage exhaust follower.
We had a light snow shower (about 4 inches), and so I burst out the snowblower to attempt it out. As anticipated, when I finished cleaning out the snow from the driveway and put away the snowblower in the garage, the still-warm engine began to have an odor up the garage. I involved the new exhaust follower for a couple of hours, and the garage was back to regular.
The complete expense of placing the vent fan in the garage was around $150 and was jointly regarding a day's worth of job. If you are in demand of exhaust followers in the garage, this tutorial will have your new garage wall exhaust fan up and running in a snap! I was truly delighted with the garage vent fan.
Garage Exhaust Fan Universal City, CA
I did add one even more thing to our garage air vent follower. I had actually been manually transforming the follower on and off as required. In some cases I left it running longer than I expected. I desired a better system of turning the fan off. I wound up purchasing an digital timer button and connected the fan into it.
Obviously you desire to make certain that the method the follower is switched on is hassle-free to you. Would you wish to have even more than one switch? Perhaps a motion detector controller would be also much better? Now is the moment to choose. you need to have a supply of "compose air".
It may deserve it to run a duct simply to compel the air to stream throughout. If you wish to get fancy, you can incorporate some degreee of filtering system. This is outside the extent of your question yet I constantly like to make sure a job area is well lighted with plenty of lumens and as little glow as possible.
is the turning component of the follower that relocates the air. encloses and shields the motor and impeller and guides the air flow. where the air is expelled from the follower, typically with an air vent, duct, or sutter. that turns the follower on and off. An exhaust follower's ability is the amount of air it can move, which is determined in cubic feet per min (CFM).
Exhaust Fan Installers Near Me Universal City, CA
Are you thinking about a DIY garage exhaust fan installation however not sure if it's really required? Below are some of the crucial benefits: Exhaust fans get rid of pollutants, fumes, and odors that can gather in your garage.
Nonetheless, you may need to double the ability if you run a shop that creates whole lots of fumes or dirt. You've got a couple of options when it pertains to the kind of fan: These prevail and relatively very easy to mount. They take place your garage wall surface and expel the air with the outside wall.
Professional Roof Ventilation Services Universal City, CA
Now for the enjoyable partinstalling the fan! It's not rocket scientific research yet needs some standard DIY abilities. Below's a general review of the process: Before beginning, ensure you have the right tools and materials. You'll need points like: Security glasses and gloves The exhaust fan itself A gauging tape Cable ports Wire cutters Screwdrivers A pencil Screws Jigsaw A pierce Security initially, folks! Prior to you begin tinkering electricity, transform off the power to the circuit you'll be dealing with.
Do you want it on the wall surface or the garage ceiling? If you're putting it on the wall, guarantee it's high enough that you won't bump your directly it. If you're putting it on the ceiling, ensure it's in a place where it will provide excellent airflow. As soon as you have actually selected your spot, you must reduce an opening in the wall surface or ceiling.
Now, it's time to link the fan to the electric circuitry. The adhering to picture shows an example wiring layout for an exhaust follower and light controlled by a button and timer.
Instant Air Solutions
Address: 412 W Dryden St Apt 6 Glendale, CA 91202Phone: (747) 307-6363
Email: [email protected]
Instant Air Solutions
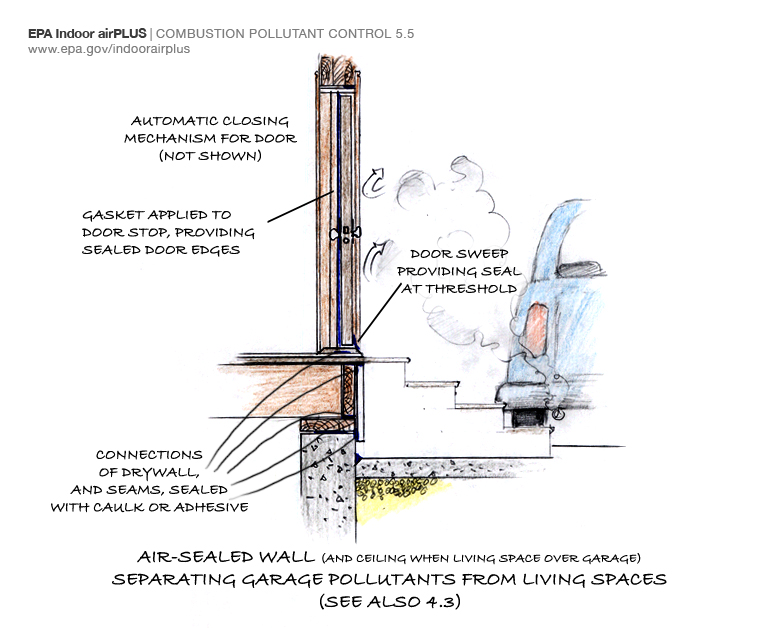
After mounting the follower, seal any voids around the real estate with caulk or weatherstripping. Doing so protects against air leaks and shuts out pests, guaranteeing your follower operates efficiently. Next off, turn the power back on and test the follower. Examine fan rate and make certain air spurts of your garage, not in.
Garage Exhaust Vent Universal City, CACommercial Exhaust Fan Installation Universal City, CA
Industrial Exhaust Fan Installation Near Me Universal City, CA
Best Garage Ventilation Universal City, CA
Professional Roof Ventilation Services Universal City, CA
Find A Good Seo Packages Universal City, CA
Local Seo Citations Universal City, CA
Garage Wall Exhaust Fan Universal City, CA
Instant Air Solutions
Table of Contents
- – Garage Exhaust Fan Universal City, CA
- – Instant Air Solutions
- – Carbon Monoxide Detector Installation Universa...
- – Garage Fume Extractor Universal City, CA
- – Commercial Exhaust Fan Installation Universal...
- – Garage Ventilation Installers Near Me Univers...
- – Exhaust Fan Installers Near Me Universal Cit...
- – Garage Exhaust Fan Universal City, CA
- – Exhaust Fan Installers Near Me Universal Cit...
- – Professional Roof Ventilation Services Unive...
- – Instant Air Solutions
Latest Posts
Rv Paint Job Mira Loma
Rv Wall Repair Diamond Bar
Health Insurance Plans For Students Rancho Santa Margarita
More
Latest Posts
Rv Paint Job Mira Loma
Rv Wall Repair Diamond Bar
Health Insurance Plans For Students Rancho Santa Margarita